After installing Linux Mint 22 on my MacBook pro 2010, I was unable to select a wireless network. After a quick search on the internet I discovered following thread and this solved my problem.
All commands have to be run as super user
1. Update the list of available packages. Install the module-assistant and wireless-tools packages:
apt-get update
apt-get install module-assistant wireless-tools
2. Build and install a broadcom-sta-modules-* package for your system, using Module-Assistant:
m-a a-i broadcom-sta
The “a-i” stands for “auto-install,” meaning “download the module source, compile it for the current kernel and install it”.
3. Blacklist the brcm80211 module, to prevent it conflicting for support of BCM4313, BCM43224 and BCM43225 devices:
First set up your Solis PV installation in the SolisCloud app.
Create your installation
Connect your Datalogger to your WiFi network
Select your installation, then go to Device S/N tab – Datalogger
Click the + icon on the bottom
Scan the QR code from on the Datalogger
Follow the steps given by the wizard
Your Datalogger is connected to your WiFi network
Add your inverter to your installation
Select your installation, then go to Device S/N tab – Inverter
Click the + icon on the bottom
Scan the QR code from on the Inverter
If yhis doesn’t work, you can manually enter the S/N in the wizard
Follow the steps given by the guide
Your inverter is added to your PV installation
Now you have to wait a while until your installation comes online and you see the values produced by the solar panels.
Next up is to integrate it in Home Assistant
First install HACS in Home Assistant and search for the Solis integration. Install the Solis integration
Then go to your Home Assistant settings/devices-services view add a new service and look for the Solis service. Once found, install it.
Open the Solis service, name your inverter and select the Solis cloud option. When done, follow the guide from the developer on his github page to obtain the needed secret, StationId and API key from Solis. Select the
Once you have completed all these steps, you should see all entities of the Solis inverter in your Home Assistant and notice they are getting feeded by values.
Now open the energy page and click on the 3 dots in right hand top corner and select energy configuration. There you can add the solis_s6_energy_today sensor in your solar production tab.
That is all you have to do to get the solar production in your Home assistant.
Connect to your cloudkey with SSH. Use root as username and the password set in the Unifi OS console
Download the version of the app you want to install: wget https://dl.ui.com/unifi/6.5.55/unifi_sysvinit_all.deb (You can find links on the release notes for the relevant version).
When trying to take a full stop backup of my LXC containers in Proxmox, I get the following error output:
INFO: starting new backup job: vzdump 107 --mode stop --compress zstd --remove 0 --node hp2 --storage truenas-nfs-hdd --notes-template ''
INFO: Starting Backup of VM 107 (lxc)
INFO: Backup started at 2022-08-20 15:12:12
INFO: status = running
INFO: backup mode: stop
INFO: ionice priority: 7
INFO: CT Name: pihole-secondary
INFO: including mount point rootfs ('/') in backup
INFO: stopping virtual guest
INFO: creating vzdump archive '/mnt/proxmox-nfs-hdd/dump/vzdump-lxc-107-2022_08_20-15_12_12.tar.zst'
INFO: tar: /mnt/proxmox-nfs-hdd/dump/vzdump-lxc-107-2022_08_20-15_12_12.tmp: Cannot open: Permission denied
INFO: tar: Error is not recoverable: exiting now
INFO: restarting vm
INFO: guest is online again after 5 seconds
ERROR: Backup of VM 107 failed - command 'set -o pipefail && lxc-usernsexec -m u:0:100000:65536 -m g:0:100000:65536 -- tar cpf - --totals --one-file-system -p --sparse --numeric-owner --acls --xattrs '--xattrs-include=user.*' '--xattrs-include=security.capability' '--warning=no-file-ignored' '--warning=no-xattr-write' --one-file-system '--warning=no-file-ignored' '--directory=/mnt/proxmox-nfs-hdd/dump/vzdump-lxc-107-2022_08_20-15_12_12.tmp' ./etc/vzdump/pct.conf ./etc/vzdump/pct.fw '--directory=/mnt/vzsnap0' --no-anchored '--exclude=lost+found' --anchored '--exclude=./tmp/?*' '--exclude=./var/tmp/?*' '--exclude=./var/run/?*.pid' ./ | zstd --rsyncable '--threads=1' >/mnt/proxmox-nfs-hdd/dump/vzdump-lxc-107-2022_08_20-15_12_12.tar.dat' failed: exit code 2
INFO: Failed at 2022-08-20 15:12:17
INFO: Backup job finished with errors
TASK ERROR: job errors
Research
Some posts recommend setting a local temp directory in /etc/vzdump.conf for each node. While this would work, my nodes do not have a lot of local storage, and there is the potential for them to run out of space when taking backups. Additionally, I would rather not have the write cycles on the boot drives if possible.
There was another post that recommended verifying that the folders are actually writeable, and adjusting the permissions by running chmod 755 if they are not. There were no issues with the permissions set on my folders, so this is not my issue, but it may be worth checking.
The Solution
This post mentions mapping all users to root as part of the NFS configuration. Because LXC containers use linux namespaces, the user in an unprivileged container will not be root, and therefore you have to map all users. In the configuration of my NFS share on my Synology NAS, I altered the NFS-permissions squash to MAP ALL USERS TO ADMIN.
Rebooted my proxmox server and then the backup of unpriviliged LXC containers worked.
5. In the NFS rule, add the IP Address of your Proxmox server. Leave the privilege as Read/Write and then select Allow users to access mounted subfolders.
6. Save everything and then log in to Proxmox.
2. Proxmox Configuration
Now that our Synology NAS has been configured, we will need to set up Proxmox to read/write from our Synology NAS. We’ll then be able to backup Proxmox to a Synology NAS.
Select Datacenter then Storage.
2. Select Add then NFS.
3. At the NFS screen, create an ID, then enter the IP Address of your Synology NAS server. In the Export drop-down menu, the location of your Proxmox folder should automatically appear. In the Content drop-down, select ALL entries. You can then select Add.
4. Proxmox should now show the Synology NAS Storage that we created above.
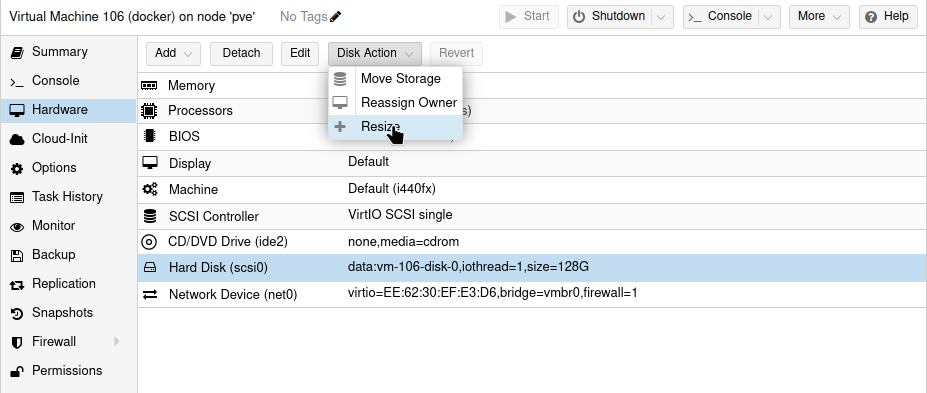
3. Back up an Individual Virtual Machine
Now that we configured Proxmox and our Synology NAS, we can easily back up a virtual machine.
Select the virtual machine you’d like to back up, then select Backup.
2. In the backup tab, select the Synology NAS storage location in the top right. This will ensure that we back up to the correct location.
3. Select Backup now in the top left corner.
4. Select your Storage, Mode and Compression, then select Backup and the backup will start!
3. Automatic Backups – How to Backup Proxmox to a Synology NAS
You can easily configure Automatic backups in Proxmox for all of your virtual machines if you’d like. This will automatically back up every virtual machine on a specific schedule.
Select Datacenter then Backup, then select Add.
2. Select the Storage for your Synology NAS, then specify the Schedule, Selection mode, Compression, and Mode.
3. You can also change the retention policy to only keep a certain number of versions by selecting the Retention tab. Without specifying a retention policy, all backups will be stored which will drastically reduce storage space on your Synology NAS over time.
4. Your virtual machines will now back up to your Synology NAS automatically after you select Create!
4. Restoring a Virtual Machine from a Backup
After the backups have been created, you can easily restore your virtual machine to one of them if you ever need to.
Select the virtual machine, then Backup.
2. Select the Synology NAS storage in the top right under Storage.
3. Select the snapshot you’d like to restore to, then select Restore.
4. All information can stay as default, then select Restore.
5. You will receive a message that this will permanently erase the existing virtual machine. If you agree, select Yes. Your virtual machine will now be restored from the backup you selected!
5. Conclusion – How to Backup Proxmox to a Synology NAS
This tutorial shows how to backup Proxmox to a Synology NAS. Overall, this is a really good way to ensure that your virtual machines are backed up properly and automatically. This also gives you a pretty easy path to backing them up offsite using Hyper Backup if you’re interested.
Thanks so much for checking out the tutorial. If you have any questions on how to backup Proxmox to a Synology NAS, please leave them in the comment section of the YouTube video above!
Prerequisites before starting the tutorial Download the Ubuntu 18.04 CT template onto a storage drive in Proxmox.
Then follow this youtube tutorial with the code listed below
First create your LXC container using the CT template you downloaded earlier
In PVE shell run following commands to finalize your setup
cd /etc/pve/lxc
nano (container number)

add these lines at the end
lxc.cgroup2.devices.allow: c 10:200 rwm
lxc.mount.entry: /dev/net dev/net none bind,create=dir

Save and close nano

run this command
chown 100000:100000 /dev/net/tun

check that it worked
ls -l /dev/net/tun
output should be something like this
crw-rw-rw- 1 100000 100000 10, 200 Dec 22 13:26 /dev/net/tun
To install Wireguard in your newly created container:
Open the console of the container and login as root with the password you made during the container creation Then visit pivpn.io to get the install link and copy this in the terminal and execute it. curl -L https://install.pivpn.io | bash
Just follow all steps during the installation wizard and you’ll have a working Wireguard instance at the end.
Deze week een energiemeter van AliExpress ontvangen. Het model is _TZE204_cjbofhxw (TS0601). Deze gekoppeld in mijn ZHA, maar er was geen enkele entiteit beschikbaar. Dus op zoek op het www en natuurlijk had iemand al een oplossing gevonden in de vorm van een custom quirk.
Om een custom quirk te kunnen laden, moet eerst de configuration.yaml aangepast worden dat deze ook geladen kunnen worden. Voeg de volgende code toe in je configuration.yaml.
Natuurlijk moet de map zha_quirks nog aangemaakt worden in je config folder in Home Assistant.
Daarna pak volgend bestand uit en upload naar de zha_quirks map
Herstart Home Assistant en ga dan naar je ZHA integratie. Koppel de energiemeter, geef hem een naam en plaats hem in een kamer.
Nu zou je in de eigenschappen van de energiemeter het gebruik van de quirk moeten zien
Herstart Home Assistant opnieuw en alles zou nu moeten werken. Dit kan je zien door de power led van de vermogensmeter die nu knippert en niet meer continue brandt. De vermogensweergave wordt pas zichtbaar nadat je de klem gebruikt hebt.
Indien er een entiteit of sensor niet zichtbaar zijn, herstart Home Assistant dan eens.
The sensor name woonkamer_temperatuur_netatmo has to be unique for each sensor you define. Change the climate.woonkamer_2 in the entity you find in your home assistant entities list.
Then in the lovelace layout insert a sensor card and look for the sensor name you specified earlier.