Setting up a WireGuard VPN server on the Raspberry Pi

Credits:
I Found this good tutorial for installing Wireguard on https://pimylifeup.com/raspberry-pi-wireguard/

In this section, we will do some initial preparatory work to make sure our Raspberry Pi is ready to install the WireGuard VPN software.

1. The first thing we need to do is ensure our Raspberry Pi is using the latest available packages.

We can do that by running the following two commands.

sudo apt update
sudo apt full-upgrade

2. We need to install the only package that we require to run the install scripts we need.

While this package should be available on most distributions of the Raspbian operating system, we will make sure by running the command below.

sudo apt install curl -y

Installing WireGuard on the Raspberry Pi

Within this section, we are going to make use of the PiVPN script to install WireGuard.

PiVPN makes the process of installing WireGuard on our Raspberry Pi a straightforward process. The script sets up the best defaults for our device.

Starting the PiVPN Install Script

1. Let us start the installation process by running the following command.

curl -L https://install.pivpn.io | bash

This command will use curl to download the PiVPN setup script from their website and then pipe it straight to bash.

You can verify this script’s contents by going directly to the install PiVPN domain in your web browser.

Installing WireGuard to your Raspberry Pi

1. The first screen you will be greeted with will let you know what this script is about to do.

To start the WireGuard installation process, press the ENTER key.

2. The first thing that we will be configuring through this script is a static IP address.

This screen explains why your Raspberry Pi should have a static IP address when operating as a WireGuard VPN server.

To proceed, press the ENTER key to proceed.

3. You will be asked if you are already using DHCP reservation.

Using DHCP reservation allows you to make your router assign an IP address to your Raspberry Pi.

In this guide, we are going to assume you haven’t used DHCP reservation and will move on to set a static IP address on  the Pi itself.

Select the <No> option and press the ENTER key to continue.

4. To set a static IP address for the WireGuard software. The installation script will want to use your default settings.

If the default IP address and gateway are correct to you, then you can safely select the <Yes> option.

Continue with this WireGuard set up guide by pressing the ENTER key.

5. You will be warned that you can potentially run into IP conflicts when using this method.

The way around that is to use DHCP reservation. However, most routers should be smart enough to stop this from being a problem.

Press the ENTER key to continue.

6. This screen will tell you that you need to specify a local user to store the WireGuard configuration files.

Continue to the next screen by pressing the ENTER key.

7. You can now select from a list of available users.

Use the ARROW keys to highlight the user then the SPACEBAR to select it.

Once you are happy with the user you have selected, press the ENTER key.

8. Finally, we can select the VPN software we want to install.

As we want to install WireGuard to our Raspberry Pi, you can press the ENTER key to continue.

The reason for this is that default by the PiVPN script selects WireGuard.

9. This screen will allow you to change the port the WireGuard uses on your Raspberry Pi.

It is recommended to keep this the same unless you have a particular reason to change the port.

Press the ENTER key to confirm the specified port.

10. This screen just confirms the port that you set your Raspberry Pi WireGuard VPN to use.

Please note to be able to access your WireGuard VPN from outside of your home network, you will need to port forward the port mentioned here. The type of this port is UDP.

Confirm that the port is still correct, then press the ENTER key to proceed.

11. We can now specify the DNS provider that we want to use for our VPN clients.

For our tutorial, we chose to use the Cloudflare one as it is relatively speedy, and they purge their logs every 24 hours.

Use the ARROW keys to navigate through this menu. Once you have found the DNS provider you want to use, press the SPACEBAR key.

If you are happy with your selection, press the ENTER key to confirm it.

12. You can specify two different ways you want to access your WireGuard VPN.

Using your public IP address is the easiest option. However, this should only be used if you have a static IP address.

The other option is to use a domain name. You can set up this option by following our dynamic DNS guide.

For this guide, we will be sticking with using our public IP address.

Once you have the option you want to be selected, press the ENTER key to proceed.

13. The PiVPN script will now generate the server key that WireGuard requires.

All you need to do here is press the ENTER key again.

14. This screen will give you a quick rundown about unattended-upgrades and why you should enable them.

Go to the next step by pressing the ENTER key.

15. You can now enable the unattended-upgrades by selecting the <Yes> option.

We highly recommend that you enable these to ensure your Raspberry Pi will download security fixes regulary.

Not enabling this will potentially leave your WireGuard VPN vulnerable to attack.

Once you have the option you want to be selected, press the ENTER key to confirm it.

16. You have now successfully installed the WireGuard VPN software to your Raspberry Pi.

This screen will let you know that you still need to create profiles for the users, which we will cover in the next section.

Press the ENTER key to continue to the last two steps.

17. You will be asked whether you want to restart your Raspberry Pi before continuing.

We recommend that you choose the <Yes> option.

Once you have selected to reboot, press the ENTER key twice to restart.

Creating your First WireGuard Profile on your Raspberry Pi

Now that we have successfully installed the WireGuard software to our Raspberry Pi, we can create a profile for it.

To be able to create this profile, we will be making use of the PiVPN script again.

1. To begin creating a new profile for WireGuard, we need to run the following command.

sudo pivpn add

2. All you need to do is type in a name for the profile that you are creating.

For example, we will be calling our profile “PiMyLifeUp“.

Once you have created a profile, it will be stored within the directory specified in the output.

If you followed the previous steps and used the pi user, you will be able to find the config file within the /home/pi/configs directory.

As a final step edit the PiMyLifeUp in /home/pi/configs to include the listenport in the interface section, otherwise you will look like connected to the server, but no data is send.

[Interface]
PrivateKey = xxxxxxxxxxxxxxxxxx
Address = xx.xx.xx.xx/24
DNS = 9.9.9.9, 149.112.112.112
ListenPort = 51820

You can use the config file within here to set up your WireGuard clients. However, there is another method which we will go into in the next section.

Generating a QR Code for your WireGuard Profile

In this section, we will show you how to generate a QR code for the WireGuard profile we generated on our Raspberry Pi.

You will be able to scan this QR code using your device. This saves you from having to copy the config file from your device.

Luckily for us, the PiVPN software comes with a QR code generator that we can use.

1. To generate a QR code for your profile, you will need to start by running the following command.

Make sure you replace “PROFILENAME” with the name you set in the previous section. In our case, this will be “PiMyLifeUp“.

pivpn -qr PROFILENAME
or
pivpn -qr

And select the profile you are generating the QR code for

2. You can then scan this QR code using your iOS or Android devices.

You can find the WireGuard app on both the Google Play Store and the Apple App Store.

When scanning the QR code, you will be asked to enter a name for the profile.

At this point, you should now have successfully got a WireGuard VPN running on the Raspberry Pi.

Finally, when you have done all steps and are able to connect to the WireGuard server on your Pi, but unable to connect to your LAN or the internet, then run the following command and make the necessary repairs to get it fixed

pivpn -d

If you need to show the QR code for a profile afterwards, then use the following command

sudo su
qrencode -t ansiutf8 < /etc/wireguard/clients/PROFILE.conf

When you have imported the profile in your mobile app and did not change the profile.conf file manually, then change the listen port for the server in the wireguard app from automatic to 51820 or the port you used when installing the wireguard server.

You can use the following code to check the connection status of your clients

sudo wg show

This will be the displayed result

interface: wg0
public key: xxxxxxxxxxxxxxx=
private key: (hidden)
listening port: 51820

peer: xxxxxxxxxxxxxxxx=
preshared key: (hidden)
endpoint: xx.xx.xx.xx:xx
allowed ips: xx.xx.xx.xx/32
latest handshake: 24 minutes, 30 seconds ago
transfer: 99.52 KiB received, 314.70 KiB sent

Add Push Notifications to MotionEyeOS

MotionEyeOS is perfect for using your Pi as a CCTV camera. Want to detect movements while you’re out? Then read on…

One benefit of MotionEyeOS is its ability to detect motion and capture images and movies of what triggered it. You can also access a live stream of your camera online, even when you’re not home, which is handy if you want to check in every now and then. When away from home, being notified of any movement is very useful, and MotionEyeOS has a nifty option for custom notifications.

The full article can be found in The MagPi 43 and was written by Wesley Archer

This guide will assume you have already set up and configured MotionEyeOS. A Pushover licence is required, which costs £3.99/$4.99. For help, check out the MotionEyeOS wiki.

You’ll need

MotionEyeOS

Raspberry Pi

Pushover app for iOS or Android with full licence (£3.99/$4.99)

STEP-01 Create an application in Pushover

Pushover has a great, easy to use API. Before we start, we need to register an application with it. Click on Register Application under the Your Applications heading on the Pushover website (pushover.net). Give your app a name – something like RaspiMotion – and then make sure the type is Application. Give your app a quick description (e.g. ‘Push notifications sent by my Raspberry Pi’) and, if feeling creative, upload a custom icon which will show in your Pushover client app whenever a notification is sent.

STEP-02 Get your API token and user key

Once you have created your application, you should have access to an API token/key. This is a unique combination of numbers and letters – please keep this a secret! You’ll also need your user key, which is shown once you log into Pushover’s website. Okay, so you have an app and your API and user keys. You’ll now need to download (or recreate if you so wish) a simple Python script to tell your Raspberry Pi to work its magic once the script is called upon by MotionEyeOS.

STEP-03 Create your Python script

MotionEyeOS is not like Raspbian. You cannot use certain commands as you would normally, such as git clone, so we’ll have to create our Python script manually; you can also drag and drop using WinSCP if preferred. We also don’t need to use sudo, as we’re already logged in as root by default. Our script needs to live in the data folder, so let’s go there and create pushover.py using nano: cd /data nano pushover.py

cd /data
nano pushover.py

Once here, you’ll need to copy and paste or type in the code listing, while also including your API token and user key where required.

import httplib, urllib

conn = httplib.HTTPSConnection(“api.pushover.net:443”)
conn.request(“POST”, “/1/messages.json”,
urllib.urlencode({
“token”: “APP_TOKEN”, # Insert app token here
“user”: “USER_TOKEN”, # Insert user token here
“html”: “1”, # 1 for HTML, 0 to disable
“title”: “Motion Detected!”, # Title of the message
“message”: “Front Door camera!”, # Content of the message
“url”: “http://IP.ADD.RE.SS”, # Link to be included in message
“url_title”: “View live stream”, # Text for the link
“sound”: “siren”, # Define the sound played
}), { “Content-type”: “application/x-www-form-urlencoded” })
conn.getresponse()

STEP-04 Make your script executable

As with any script, we need to make sure it can be executed, otherwise it’s nothing more than a fancy collection of text! You can do this either from the command line or from within WinSCP. From the command line, make sure you’re in the data folder and then type: chmod +x pushover.py

chmod +x pushover.py

Or, if using WinSCP, select the pushover.py file in the data folder, then press F9. In the window that appears, change the permissions to 0755 and then click ‘OK’ to confirm.

STEP-05 Configure MotionEyeOS to use your script

Now that we have our script, we need to tell MotionEyeOS to use it when it detects motion. To do this, log in, go to the Motion Notifications menu and turn on the ‘Run A Command’ option. You then need to specify which command to run, which will be the Python script you just created – this is /data/pushover.py. Click Apply once done, to confirm the changes.

STEP-06 Test it out!

Hopefully, by now you have created your Python script, made it executable, told MotionEyeOS to use your script when it detects motion, and have the Pushover app installed on your smartphone or tablet. We now need to test that it works! Wave your hand in front of your camera (or you can do a dance if you’re feeling energetic!) and then shortly afterwards you should receive a notification via Pushover, warning you that motion has been detected!

Feel free to experiment with the script to customise the message displayed and sound played in Pushover.

MotionEyeOS on Raspberry Pi – Surveillance Camera System

Do you want to turn your Raspberry Pi into a surveillance camera system? The best way to do it is using MotionEyeOS. In this post we’ll show you how to get started with MotionEyeOS on your Raspberry Pi.

What is MotionEyeOS?

MotionEyeOS is a Linux distribution that turns your single-board computer into a video serveillance system. The MotionEyeOS supports the following devices:

  • Raspberry Pi (all versions);
  • Banana Pi;
  • Odroid C1/C1+, Odroid C2, Odroid XU4;
  • Pine A64/A64+.

MotionEyeOS Features

MotionEyeOS is the perfect solution to build your own surveillance system because it is simple to install and has a web-based, user-friendly interface that is responsive in practically any browser.

It supports most USB cameras, Raspberry Pi camera modules, and IP cameras. Additionally, it brings other useful features when it comes to a surveillance system:

  • Motion detection with email notifications
  • You can set set a working schedule
  • Take still images
  • Store your files in SD card, USB drive, or upload your files to Google Drive or Dropbox
  • Access your media files through FTP server or SFTP server

Parts Required

For this project we’re using the following parts:

  • Raspberry Pi 3 – read Best Raspberry Pi starter kits
  • Camera – Raspberry Pi camera V2 module, USB webcam or IP camera
  • Power Supply 
  • MicroSD Card

Installing MotionEyeOS

To install MotionEyeOs in your Raspberry Pi 3, follow the next steps.

Formatting your microSD card

You’ll install MotionEyeOS on a microSD card and then, insert the microSD card into your Raspberry Pi board. But first, you need to format you microSD card – there are several ways to do this, but we recommend following the next procedure:

  • Go to https://www.sdcard.org/downloads/formatter/ and download the SD Card Formatter software for your operating system.
  • Install the SD Card Formatter software.
  • With your microSD card connected to your computer, open the SD card Formatter application, and format your microSD card with the “overwrite format” option.

Downloading the OS Image

Choose the right image for your device: MotionEyeOS releases page. If you’re using the Raspberry Pi 3, choose motioneyeos-raspberrypi3-xxxxxxxx.img.gz.

Writing the Image

Next, extract the image from the .zip folder. Then, you can use win32diskimager or Etcher, to write the image onto the SD card.

We’re going to use Etcher. If you don’t have Etcher installed, you can click here and install it on your computer.

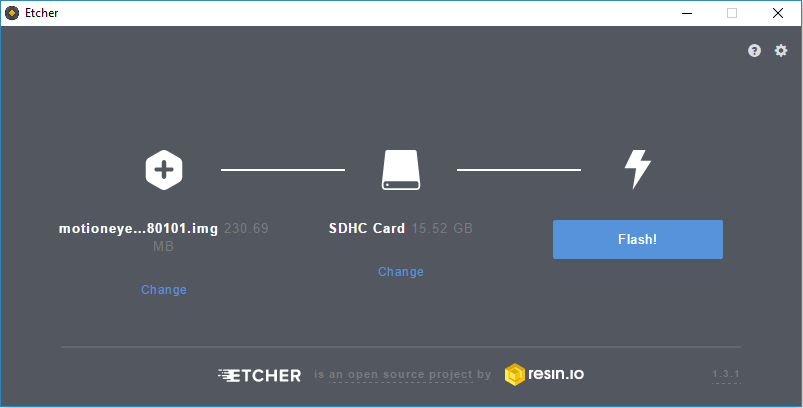
With the microSD card formatted, and connected to your computer, open Etcher. Select the image you’ve get previously, select your microSD card, and click Flash!

Booting MotionEye on Raspberry Pi

Follow the next steps to boot MotionEyeOS for the first time on your Raspberry Pi.

  • Insert the microSD card in the Raspberry Pi;
  • Connect an Ethernet cable – this is needed on the first boot;
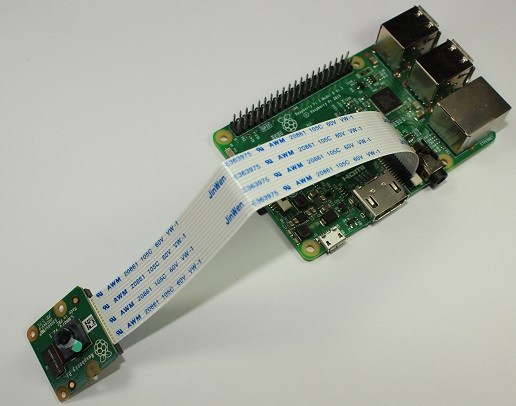
  • Connect a camera. If you’re using the Raspberry Pi camera V2 module, make sure you’ve connected the camera in the right orientation as shown in the following image;
  • Apply power to your Pi, and wait for about 2 minutes for the system to be ready.

Now, to access your Raspberry Pi, you need to find your Pi’s IP Address

Finding Your Raspberry Pi IP Address

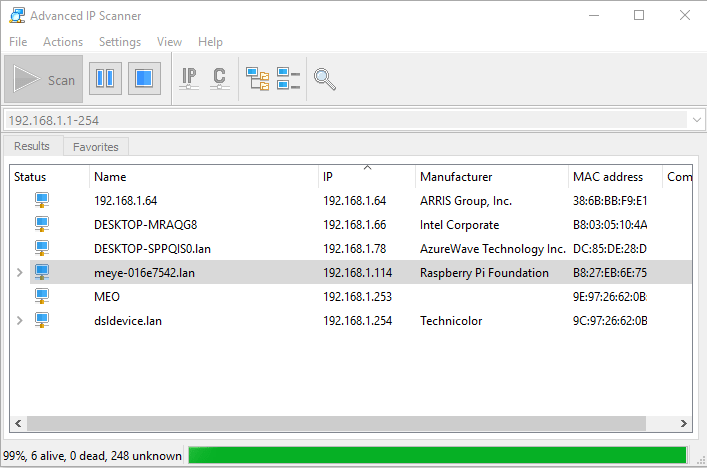
To Find your Raspberry Pi IP address, you can use Angry IP Scanner. The IP you’re looking for is the one with “meye” on the name, as shown in the following figure.

Accessing MotionEye For the First Time

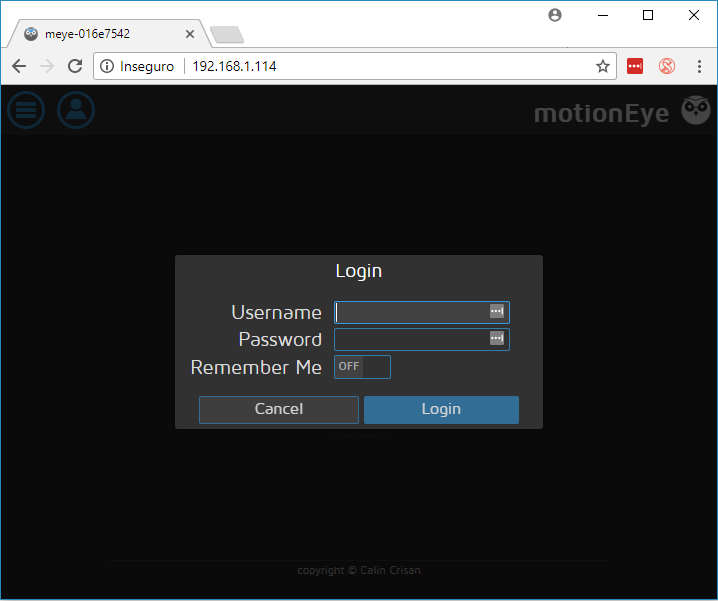
Open your browser and type the Raspberry Pi IP address. You’ll see the MotionEye login page.

At the first boot, use the following credentials:

  • Username: admin
  • Password: [No password, leave blank]

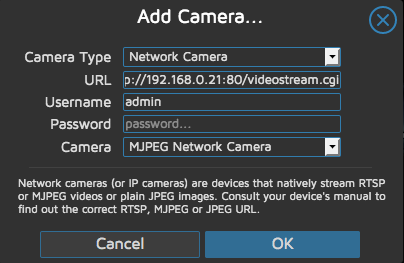
If you have a camera connected to your Pi, it should be detected automatically, and you should see a live image from the camera. If you have an IP camera, you need to add it as network camera with the camera stream address with your login credentials for that camera

Foscam C1:

MJPEG – http://[IPADDRESS]:[PORT]/cgi-bin/CGIProxy.fcgi?cmd=snapPicture2&usr=[USERNAME]&pwd=[PASSWORD]

RTSP – http://[IPADDRESS]/videoMain

Initial Setup

You can configure pretty much everything in your web user interface. We recommend taking a look at the following configurations when configuring the MotionEyeOS for the first time.

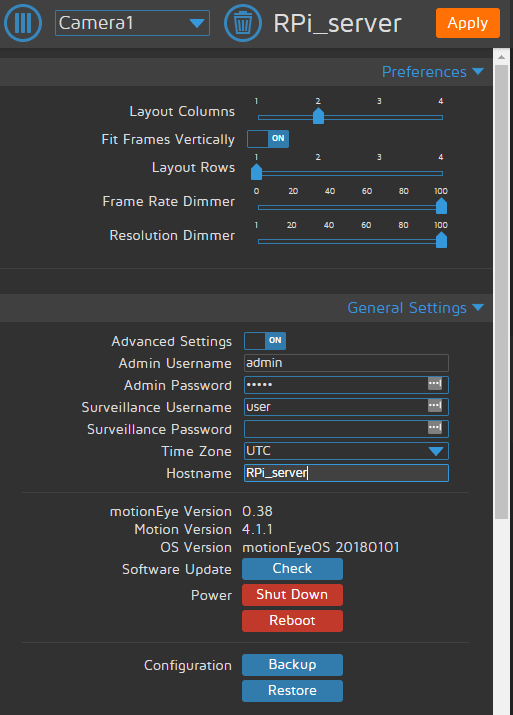
  • Go to the three bars menu, and open the General Settings;
  • Enable Advanced Settings;
  • You can change the admin username and set a password;
  • You can also set a name for a surveillance user, and its corresponding password;
  • Set your timezone and a hostname.

Click the orange button at the top right “Apply” to apply the changes – this will require a reboot.

Wrapping Up

This was just an introduction on how to get started with MotionEyeOS on the Raspberry Pi 3. In this example we’re using a single device (the Raspberry Pi board) with two cameras, but it can be more useful using a Raspberry Pi 3 as a Hub, and then use several cameras in different locations

If you want to add push notifications in motionEye, then follow the next guide: https://www.tommybaert.be/add-push-notifications-to-motioneyeos/

Automatically connect a Raspberry Pi to a Wifi network with a Belkin N300 micro USB dongle

Setting up WiFi connection

Start by booting the Raspberry Pi, connected to a display and a keyboard. Open up the terminal and edit the network interfaces file:

$ sudo nano /etc/network/interfaces

This file contains all known network interfaces, it’ll probably have a line or two in there already.

Change the first line (or add it if it’s not there) to:

auto wlan0

Then at the bottom of the file, add these lines telling the Raspberry Pi to allow wlan as a network connection method and use the /etc/wpa_supplicant/wpa_supplicant.conf as your configuration file.

allow-hotplug wlan0
iface wlan0 inet dhcp
wpa-conf /etc/wpa_supplicant/wpa_supplicant.conf
iface default inet dhcp

(ctrl-X, then type Y to quit and save)

The next step is to create this configuration file.

Configuring WiFi connection

Open up the wpa_supplicant.conf file in the editor.

$ sudo nano /etc/wpa_supplicant/wpa_supplicant.conf

Again, some lines might already be present, just add the following.

network={
ssid="YOUR_NETWORK_NAME"
psk="YOUR_NETWORK_PASSWORD"
proto=RSN
key_mgmt=WPA-PSK
pairwise=CCMP
auth_alg=OPEN
}

Make sure it works

Reboot the Raspberry Pi and it should connect to the wireless network.

sudo reboot

A static IP

Since the goal of this tutorial is to be able to work with the RPi without external keyboard or display, you want to be ssh into it. The best way is to make sure it’ll always have a static IP on your network.

Doing so is simple. Open the /etc/network/interfaces file again and add the following changes:

Change iface wlan0 inet dhcp into iface wlan0 inet static. This changes the wlan0 interface from DHCP to static.

Add the following lines before the wpa-conf line:

address 192.168.1.155 # Static IP you want 
netmask 255.255.255.0 
gateway 192.168.1.1   # IP of your router

Reboot your Raspberri Pi

sudo reboot


Raspberry Pi als netwerk – en AirPrint printserver

Raspi_Colour_R

Installatie:

  • download de laatste raspbian wheezy van de download pagina van Raspberry
  • download Win32DiskImager hier en installeer het.
  • Start Win32DiskImageren en gebruik het gedownloade schijfbestand van raspbian. Dit wordt naar dan op de SD kaart geschreven

Eerste boot:

  • Je komt in het configuratiemenu van raspbian. Dit kun je naderhand nog terug oproepen door het commando sudo raspi-config uit te voeren. Hier moet je zeker volgende stappen uitvoeren:
    1. expand-rootfs zo krijg je de volledige schijfruimte terug beschikbaar na de volgende reboot
    2. memory-split hiermee wijs je het nodige geheugen toe aan de GPU, voor server is 16MB voldoende
    3. SSH server activeren
    4. Standaard paswoord wijzigen voor de gebruiker pi
    5. voor de rest kun je nog alle instellingen voor tijd en toetsenbord ook aanpassen
  • druk op Finish en de Raspberry Pi zal herstarten

Static ip adres toewijzen:

  • log in met de gebruikersnaam pi  en je paswoord (standaard raspberry) als de Raspberry is opgestart
  • ifconfig eth0  zal je het DHCP toegewezen ip adres weergeven
  • sudo nano /etc/network/interfaces
  • wijzig iface eth0 init dhcp naar iface eth0 static
  • voeg volgende lijnen toe:
    1. address your.static.ip.address
    2. netmask 255.255.255.0
    3. gateway your.router.ip.address
  • sudo reboot om alle instellingen te activeren

CUPS printer software installeren:

  • de raspbian software updaten
    1. sudo apt-get update
    2. sudo apt-get upgrade
  • installeren van de printersoftware
    • sudo apt-get install avahi-daemon cups cups-pdf cups-driver-gutenprint openprinting-ppds python-cups python-daemon python-pkg-resources
  • na de installatie stellen we toegang van buitenaf in
    1. sudo nano /etc/cups/cupsd.conf
      1. zoek  Listen localhost:631  en verander het in #Listen localhost:631
      2. daaronder voeg je Port 631
      3. Daarna voegen we in de secties , en vlak voor de regel telkens de regel Allow @Local toe om de toegang te beperken tot gebruikers van de Raspberry Pi. Sla je wijzigingen op met Ctrl+O en sluit nano af met Ctrl+X.
        putty-raspberry

Beheerder toevoegen:

  • Herstart de cups server door sudo service cups restart uit te voeren
  • voeg de gebruiker pi toe aan de beheerders van de printserver door sudo adduser pi lpadmin uit te voeren

Bezoek nu in je webbrowser de url https://IP:631/, waarbij IP het IP-adres van je Raspberry Pi is. Als je een waarschuwing krijgt over het beveiligingscertificaat, negeer dat dan

cups_main