Add Smartwares CIP-37210AT IP camera in Surveillance Station

I managed to add the Smartwares CIP-37210ET IP camera, which I got from the Action store, in Synology Surveillance Station. I will explain how I did it below.

First install your camera with the HomeWizard Cameras app from smartwares.eu.
Write down the camera password you created at the end of the wizard.

Next thing to do is assign a fixed IP address to the camera. The software of the camera doesn’t support that, so you need to do that in your internet router.

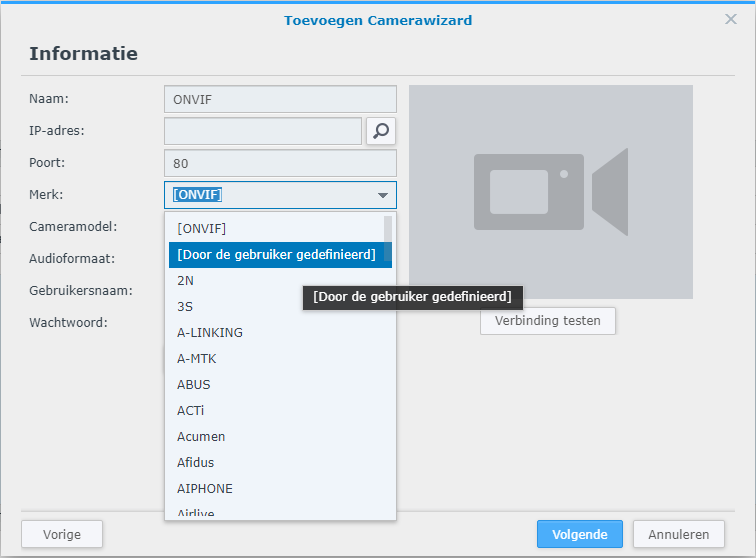
Once you have done that, open Surveillance Station and add a camera and choose quick installation

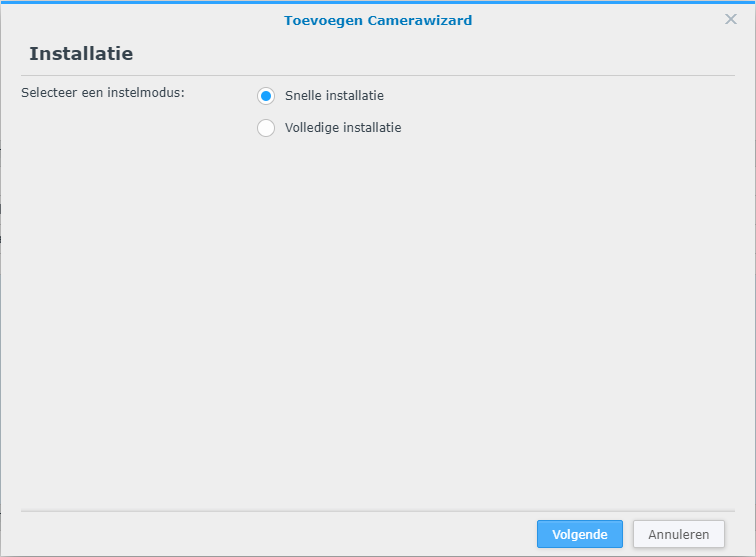
Then choose in the brand selection screen the option defined by user

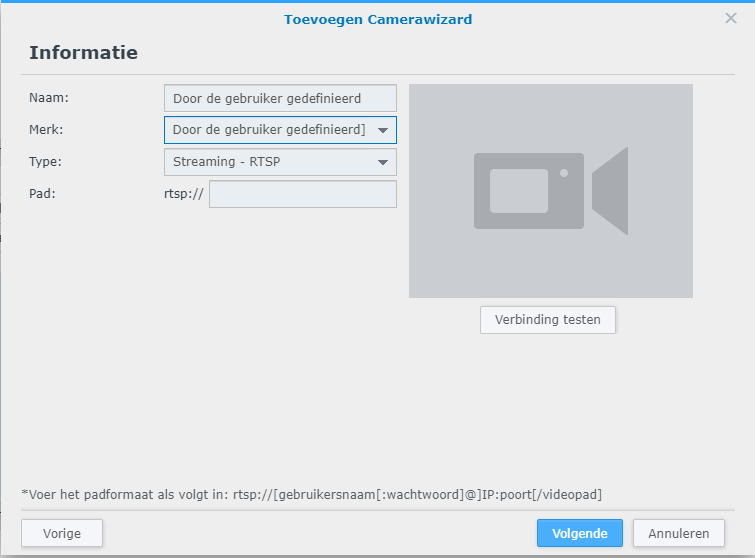
In the path you need to enter the url for the stream using the camera password you created during the wizard in the app on your phone

rtsp://admin:PASSWORD@IP:554/live/av0?

PASSWORD: password you created
IP: the fixed IP you assigned to your camera

The link you have to enter is the above text except for the rtsp://

admin:abcde12345@192.168.0.240:554/live/av0?

Now you can test the connection and if everything is done right, you should see the video stream.

Synology Surveillance Station Home Mode Automation with Home Assistant

I have found a guide on the www, but it was not that 100% clear and I had to google a lot of things to be clear. But I got it 100% functional and will publish an updated guide here.

This is the url for the original guide: https://www.paolotagliaferri.com/home-automation-home-assistant-docker-synology/

Some prerequisites:

  • Docker
  • Home Assistant
  • Surveillance Station
  • Unifi network or similar that can be integrated in Home assistant

First:

Find the entity identifier of your mobile phone that is used by the Ubiquiti UniFi integration

Create a group where the entity that represents you in your configuration.yaml

Next:

Then on the Synology Surveillance Station, I generated two actions in the Action Rule section to create webhooks that Home Assistant can use for switching the Home mode on or off

First I will create the rule to enable home mode

Here you see the webhook url we will use in the secrets.yaml later on

Now you have create the rule to enable the Home mode in surveillance station. Next will be the disable Home mode rule

Here you see the webhook url we will use in the secrets.yaml later on

When you have followed all steps, this will be the result

Now we are going to define 2 variables for the webhooks in the secrets.yaml file. These variables will be used in the configuration.yaml later.

When that is done, we can go back to the configurations.yaml to define the webhooks so they can be used for automation

Finally – I defined the automation in the UI (or in the configurations.yaml file) – here’s the generated configuration

Last thing to do is to check the configuration for errors and if that passes, you can restart the Home Assistant server.

Now the moment you go out of range of your wifi, Synology Surveillance station will go out of home mode and vica versa. Keep in mind that the standard delay the Ubiquiti UniFi integration uses for switching from home to not home is 300 seconds.

Automate Docker Image and Container Updates Running on Synology

Updating docker containers is as easy as pulling the image and drop and re-create the container. This can be automated using watchtower appliance, hosted in a docker container itself.

Watchtower is a process for watching your Docker containers and automatically restarting them whenever their base image is refreshed.

Download the docker image

The image is named: centurylink/watchtower

Create container (using terminal)

I’ve set my instance to only match once a day, with a schedule set to every 23h. It will also ensure old image versions are pruned.

Start a terminal session. Log in as a user and then type sudo -i with the admin password to get the root permissions

As root type following code:

root@synology:~# docker run -d –name watchtower -v /var/run/docker.sock:/var/run/docker.sock centurylink/watchtower –interval 82800 –cleanup

Automatically check and upgrade running containers

Watchtower will periodically check the repos for updates and upgrade when neccessary, pruning old image versions when upgrade completes.

This will also update the Watchtower image.

Sickbeard Custom error when starting the package

Problem:

It displayed the following error when starting the package in the package manager.

Failed to run the package service

Solution:

Change the user in the start-stop-status file of sickbeard-custom to “root”.

Steps:

  1. Log into synology through putty (or similar) as “root”.
    1. first log in as admin with the admin password
    2. then type “sudo -i”
    3. use the admin password again
    4. you are now logged in as root
  2. enter “vi /var/packages/sickbeard-custom/scripts/start-stop-status
  3. Navigate (using arrow keys on keyboard) to line that says “USER=”sickbeard-custom” (about 4 lines down)
  4. Using the Basic commands for the Linux vi Editor http://forum.synology.com/wiki/index.php/Linux_VI_Editor
    • delete (x) the word “sickbeard” and replace/insert (i) it with the word “root”
    • Press ESC to exit insert mode
    • Press SHIFT :wq then enter to save and exit.
  5. Type “vi /var/packages/sickbeard-custom/scripts/start-stop-status” to confirm that the USER has been correctly changed to root.
  6. Close and exit Putty if you desire.
  7. Open sickbeard web management page [http://<Diskstation IP>:8083]

Baïkal – Lightweight CalDAV+CardDAV server

You can download and install this package on your synology diskstation.

http://baikal-server.com

Unpack the package and upload it to your web folder on the diskstation.
After the upload go with your web browser to the path.

http://ip.of.your.diskstation/baikal

Complete all required information and then you are ready to use it.

After login you create a new user.

To add your calendar in your calendar software or IOS device you need to enter the caldav information in the program.

On your disk station you need to enable the https and add an non standard https port. This port you need to forward in your router to your disk station ip-address.

server:

https://your.ip.address:httpsport/cal.php/principals/username

your.ip.adress: is the public or private ip address
httpsport: is the custom https port you entered in your synology disk station and in the portforward of the router
username: is the username you created earlier.

if you’ve done everything right, the calendar should show up in your calendar software.

To add your contacts you need to enter the CardDAV information in the program.

server:

https://your.ip.address:httpsport/card.php/principals/username

your.ip.adress: is the public or private ip address
httpsport: is the custom https port you entered in your synology disk station and in the portforward of the router
username: is the username you created earlier.

if you’ve done everything right, the contacts should synchronise between devices where the CardDAV is installed on.

Synology RS411 start niet meer op

SynologyLogo

Vorige week was de RS411 vastgelopen. Ik kon hem niet meer benaderen via de webinterface, noch langs de Synology Assistant. In deze werd hij zelfs niet meer weergegeven.

Toen ik boven kwam, zag ik alle harddrive leds simultaan flashen, alsook de power led. Ik heb dan geprobeerd hem uit te zetten met de power knop, maar dit werkte niet. Dan maar het netsnoer uitgetrokken.
Daarna bij het opstarten bleef de power led flashen, geen harddrive leds en status led zichtbaar.
De Synology Assistant vond hem weer, maar de RS411 bleef staan op “bezig met starten van services” staan. Voor de rest werkte er niets meer.
Dan er alle schijven uitgehaald en opgestart zonder harddisks en bij wonder begon de status lamp te pinken dat er geen harddisks geinstalleerd waren.
Dan heb ik een oude harde schijf ingebouwd en de RS411 opgestart en deed hij alles normaal. Dus oude schijf eruit alle harddisks er terug in en bij wonder startte hij terug op.

Nu een week later hetzelfde probleem, alleen krijg ik hem nu niet meer online. Gelukkig staat SSH aan op deze RS411 en kon ik hem wel benaderen via SSH. Dus ben ik nu alle gegevens aan het back-uppen naar mijn desktop via WinSCP.

Om in te loggen via WinSCP, moet je root als username gebruiken en het paswoord van je admin account.

Update:
Na de backup heb ik DSM opnieuw geinstalleerd en bij wonder was er niets van gegevens weg en werkte alles terug zoals voordien

Synology Notification forwarder BETA package from Qtip

pushover_med

Pushover instellingen:

Helemaal beneden bij Your applications klik je op edit en dan op Create a New Application.

Dan geef je onderstaande info in en klik dan op save

Name: DSM Notifier
Type: Application
Description: Notification forwarder
Url: Niet invullen
New Icon: hier kun je een icoontje laden

Als je dit nu opslaat, krijg je een API Token/key. Deze zal je straks gebruiken in de instellingen voor de forwarder.

Nu zal je de  API Token/Key en je User Key in het veld Username:Password ingeven als volgt:
<API Token/Key>:<User Key> zonder de <>

Als je dit nu test, zal je pushover notifications krijgen op je toestellen.