First set up your Solis PV installation in the SolisCloud app.
Create your installation
Connect your Datalogger to your WiFi network
Select your installation, then go to Device S/N tab – Datalogger
Click the + icon on the bottom
Scan the QR code from on the Datalogger
Follow the steps given by the wizard
Your Datalogger is connected to your WiFi network
Add your inverter to your installation
Select your installation, then go to Device S/N tab – Inverter
Click the + icon on the bottom
Scan the QR code from on the Inverter
If yhis doesn’t work, you can manually enter the S/N in the wizard
Follow the steps given by the guide
Your inverter is added to your PV installation
Now you have to wait a while until your installation comes online and you see the values produced by the solar panels.
Next up is to integrate it in Home Assistant
First install HACS in Home Assistant and search for the Solis integration. Install the Solis integration
Then go to your Home Assistant settings/devices-services view add a new service and look for the Solis service. Once found, install it.
Open the Solis service, name your inverter and select the Solis cloud option. When done, follow the guide from the developer on his github page to obtain the needed secret, StationId and API key from Solis. Select the
Once you have completed all these steps, you should see all entities of the Solis inverter in your Home Assistant and notice they are getting feeded by values.
Now open the energy page and click on the 3 dots in right hand top corner and select energy configuration. There you can add the solis_s6_energy_today sensor in your solar production tab.
That is all you have to do to get the solar production in your Home assistant.
Deze week een energiemeter van AliExpress ontvangen. Het model is _TZE204_cjbofhxw (TS0601). Deze gekoppeld in mijn ZHA, maar er was geen enkele entiteit beschikbaar. Dus op zoek op het www en natuurlijk had iemand al een oplossing gevonden in de vorm van een custom quirk.
Om een custom quirk te kunnen laden, moet eerst de configuration.yaml aangepast worden dat deze ook geladen kunnen worden. Voeg de volgende code toe in je configuration.yaml.
Natuurlijk moet de map zha_quirks nog aangemaakt worden in je config folder in Home Assistant.
Daarna pak volgend bestand uit en upload naar de zha_quirks map
Herstart Home Assistant en ga dan naar je ZHA integratie. Koppel de energiemeter, geef hem een naam en plaats hem in een kamer.
Nu zou je in de eigenschappen van de energiemeter het gebruik van de quirk moeten zien
Herstart Home Assistant opnieuw en alles zou nu moeten werken. Dit kan je zien door de power led van de vermogensmeter die nu knippert en niet meer continue brandt. De vermogensweergave wordt pas zichtbaar nadat je de klem gebruikt hebt.
Indien er een entiteit of sensor niet zichtbaar zijn, herstart Home Assistant dan eens.
Most of this information can already be found around the internet, but since I wanted to integrate one as well for my Home Assistant instance, why not to share the same with you?
Integrating Nord Pool to the Home Assistant
First we need to get the Nord Pool prices into the system so a new integration is needed. Luckily (again) someone has already made it happen and it can be installed using HACS. If you don’t know what HACS is, it’s a Home Assistant Community Store, a place where tons of integrations and frontend elements are published and can be easily installed. Just need to remember that those are not official Home Assistant components and are maintained by individual people and therefore can break more easily than official ones.
Anyway, start by installing Nord Pool custom component. This integration does not have UI configuration so the has to be done manually to the configurations.yaml.
For example, here’s my config:
Add the following code in the sensor segment. If you already have sensors defined, omit the "sensor:" line

sensor:
  - platform: nordpool
    VAT: true
    currency: "EUR"
    price_in_cents: true
    region: "FI" // check nordpool website for your region
    precision: 3
    price_type: kWh
In above configration firstly we enable the integration and second we configure the sensor to use region Finland and currency in Euros. Some tweaking to precision and VAT is also done, but more configuration details can be found from the integration repository.
After everything is configured, restart the Home Assistant and continue to the UI part.
Making the UI
First let’s find the entity id from our integrations. In Home Assistant go to Settings->Devices & Services->Entities and search with the filter ‘nordpool‘. You should find a entity id (that is same as unique id) and write it down somewhere. Unique id is generated by the Nord Pool integration from the configuration we made in the previous chapter.
For this part I’m using Apex Charts Card that is very versatile graphical presentation card of various values. Again, this frontend card can be installed using HACS. So go to the HACS and search for Apex and install it.
After installation is succeeded, it’s time to configure two cards (one for today and one for tomorrow).
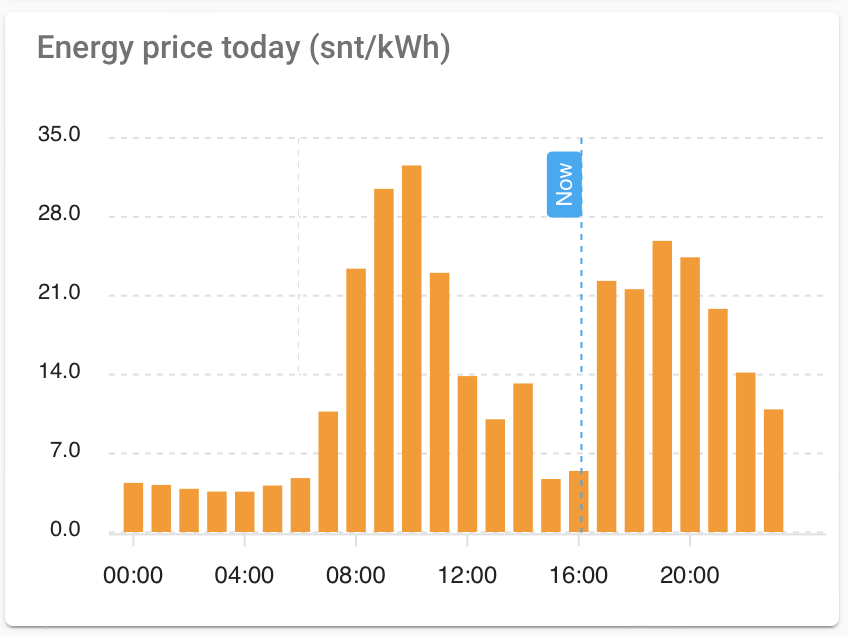
Here’s my configuration for the cards (example UI shown at the end of this chapter):
type: custom:apexcharts-card
graph_span: 24h
header:
title: Energy price today (c/kWh)
show: true
span:
start: day
now:
show: true
label: Now
series:
- entity: sensor.nordpool_kwh_fi_eur_3_10_024// use your nordpool entity
type: column
data_generator: |
return entity.attributes.raw_today.map((start, index) => {
return [new Date(start["start"]).getTime(), entity.attributes.raw_today[index]["value"]];
});
type: custom:apexcharts-card
graph_span: 1d
header:
title: Energy price tomorrow (c/kWh)
show: true
span:
start: day
offset: +1d
series:
- entity: sensor.nordpool_kwh_fi_eur_3_10_024// use your nordpool entity
type: column
data_generator: |
return entity.attributes.raw_tomorrow.map((start, index) => {
return [new Date(start["start"]).getTime(), entity.attributes.raw_tomorrow[index]["value"]];
});
Again, you can use the same configurations, just remember to change the proper entity id for the cards (the one that we wrote down in previous chapter).
That’s it! Now there should be todays electrical spot prices and tomorrows spot prices available in the Home Assistant for any use!
To make it smart keep on reading the next chapters..
Finding the cheapest hours
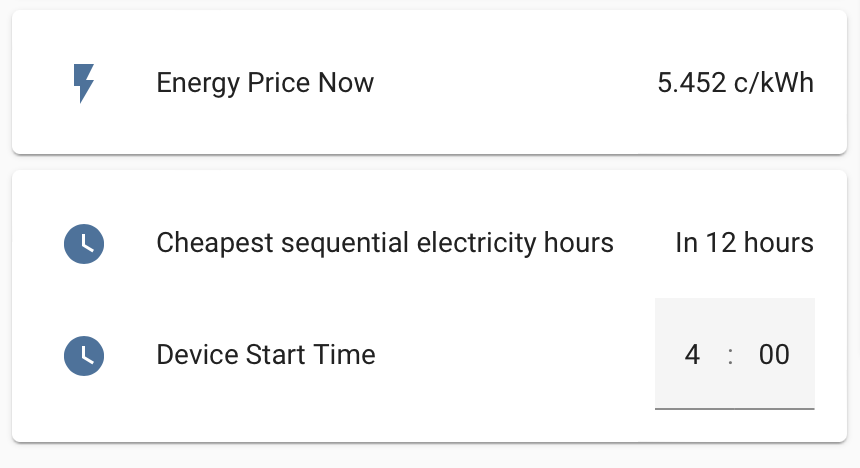
One of the key points of having Nord pool is of course finding the cheapest hour(s) and automate devices to run during those hours.
For this I’ve created a template sensor that ensures validity of next day prices (usually published by Nord Pool at 12:00) and finds the sweet spot of requested lenght!
It’s easily modifiable by changing numberOfSequentialHours (how long period are we looking for), firstHour (first possible hour we want to start) and last hour (final hour we want to stop latest). E.g. you can also use it to find cheapest hours during the next night by setting the last hour to something like 06:00.
sensor:
  - platform: template
    sensors:
      cheapest_hours_energy_tomorrow:
        device_class: timestamp
        friendly_name: Cheapest sequential electricity hours
        value_template: >
          {%- set numberOfSequentialHours = 3 -%}
          {%- set lastHour = 23 -%}
          {%- set firstHour = 0 -%}

          {%- if state_attr('sensor.nordpool_kwh_fi_eur_3_10_024', 'tomorrow_valid') == true -%}
            {%- set ns = namespace(counter=0, list=[], cheapestHour=today_at("00:00") + timedelta( hours = (24)), cheapestPrice=999.00) -%}
            {%- for i in range(firstHour + numberOfSequentialHours, lastHour+1) -%}
              {%- set ns.counter = 0.0 -%}
              {%- for j in range(i-numberOfSequentialHours, i) -%}
                {%- set ns.counter = ns.counter + state_attr('sensor.nordpool_kwh_fi_eur_3_10_024', 'tomorrow')[j] -%}
              {%- endfor -%}
              {%- set ns.list = ns.list + [ns.counter] -%}
              {%- if ns.counter < ns.cheapestPrice -%}
                {%- set ns.cheapestPrice = ns.counter -%}
                {%- set ns.cheapestHour = today_at("00:00") + timedelta( hours = (24 + i - numberOfSequentialHours)) -%}
              {%- endif -%}
            {%- endfor -%}
            {{ ns.cheapestHour }}
            {%- set ns.cheapestPrice = ns.cheapestPrice / numberOfSequentialHours -%}
          {%- endif -%}
Finally making the automations
Now that we know the cheapest hours for the next day, only thing to do is actually do the automations for various devices.
My automation is actually in two parts:
Second I run the automation when the time trigger is hit
# Helper to keep the start time
input_datetime:
  device_start_time:
    name: Device Start Time
    has_time: true
    has_date: false

automation:
# Update time trigger to cheapest hours
  - id: '1663398489357'
    alias: 'Set device start time'
    description: ''
    trigger:
    - platform: time
      at: '23:10:00'
    condition:
    - condition: not
      conditions:
      - condition: state
        entity_id: sensor.cheapest_hours_energy_tomorrow
        state: unknown
    action:
    - service: input_datetime.set_datetime
      data:
        time: '{{ as_timestamp(states(''sensor.cheapest_hours_energy_tomorrow'')) | timestamp_custom(''%H:%M'') }}'
      target:
        entity_id: input_datetime.device_start_time
    mode: single

# Finally do the actions when time trigger is hit
  - id: '1663399614818'
    alias: Increase heating
    description: ''
    trigger:
    - platform: time
      at: input_datetime.device_start_time
    condition: []
    action:
    - service: climate.set_temperature
      data:
        temperature: 24
      target:
        entity_id: climate.heat_pump
    mode: single